Docker and Webapp

In this page we will create a WebApp that serves a Docker image and see how to put it in CI/CD.

Create a Web App

If you are creating a web app in Azure portal, start with selecting Docker Container as Publish property in Basics tab. Choose Linux as Operating System. For this example a Standard SKU would just do fine.
Next, on the Docker-tab select your existing azurecr.io container registry and specify the Image:Tag you want to serve.

My tempate looks something inline with the following:

"resources": [{
        "apiVersion": "2018-11-01",
        "name": "[parameters('name')]",
        "type": "Microsoft.Web/sites",
        "location": "[parameters('location')]",
        "tags": {},
        "dependsOn": ["[concat('Microsoft.Web/serverfarms/', parameters('hostingPlanName'))]"],
        "properties": {
            "name": "[parameters('name')]",
            "siteConfig": {
                "appSettings": [{
                        "name": "DOCKER_REGISTRY_SERVER_URL",
                        "value": "[parameters('dockerRegistryUrl')]"
                    }, {
                        "name": "DOCKER_REGISTRY_SERVER_USERNAME",
                        "value": "[parameters('dockerRegistryUsername')]"
                    }, {
                        "name": "DOCKER_REGISTRY_SERVER_PASSWORD",
                        "value": "[parameters('dockerRegistryPassword')]"
                    }, {
                        "name": "WEBSITES_ENABLE_APP_SERVICE_STORAGE",
                        "value": "false"
                    }
                ],
                "linuxFxVersion": "[parameters('linuxFxVersion')]",
                "appCommandLine": "",
                "alwaysOn": "[parameters('alwaysOn')]"
            },
            "serverFarmId": "[concat('/subscriptions/', parameters('subscriptionId'),'/resourcegroups/', parameters('serverFarmResourceGroup'), '/providers/Microsoft.Web/serverfarms/', parameters('hostingPlanName'))]",
            "clientAffinityEnabled": false
        }
    }, {
        "apiVersion": "2018-11-01",
        "name": "[parameters('hostingPlanName')]",
        "type": "Microsoft.Web/serverfarms",
        "location": "West Europe",
        "kind": "linux",
        "tags": {},
        "dependsOn": [],
        "properties": {
            "perSiteScaling": false,
            "maximumElasticWorkerCount": 1,
            "isSpot": false,
            "reserved": true,
            "isXenon": false,
            "hyperV": false,
            "targetWorkerCount": 0,
            "targetWorkerSizeId": 0
        },
        "sku": {
            "Tier": "Standard",
            "Name": "S1",
            "size": "S1",
            "family": "S",
            "capacity": 1
        }
    }


As a security matter I have to point out the fact that the Web App is connecting to Azure Container Registry using 3 configuration items i.e. Server Url, Server Username and Server Password. These items are visible in Azure Portal Configuration:
DOCKER_REGISTRY_SERVER_URL, DOCKER_REGISTRY_SERVER_USERNAME, DOCKER_REGISTRY_SERVER_PASSWORD

Deploy Docker Image

In both cases where the Docker image gets pulled from Container Registry, you need to restart the instance in Container Instance and also in Web App Docker instance.

An other option would be to move the pull task into Azure Pipeline using. My example is defined as follows:

steps: 
– task: AzureRmWebAppDeployment@4 
  displayName: ‘Deploy Azure App Service’ 
  inputs: 
    azureSubscription: ‘$(Parameters.ConnectedServiceName)’ 
    appType: ‘Web App for Containers (Linux)’ 
    WebAppName: ‘$(Parameters.WebAppName)’ 
    DockerNamespace: ‘https://securedcontainerregistry.azurecr.io’  
    DockerRepository: ‘https://securedcontainerregistry.azurecr.io/securedazurelib’  
    DockerImageTag: ‘latest’  
    StartupCommand: ”

Docker and Container Registry in Azure

The purpose of this page is to show the steps to create a simple webapp running as a docker container in Azure.

Create Container Registry

I am using a new Azure Container Registry in my resource group called SecuredContainerRegistry which I will refer to throughout this page. I have created this using a Basic SKU which is sufficient enough for this purpose. If you need a private endpoint you need to change he SKU to premium.

"resources": [{
        "type": "Microsoft.ContainerRegistry/registries",
        "apiVersion": "2020-11-01-preview",
        "name": "SecuredContainerRegistry",
        "location": "[resourceGroup().location]",
        "dependsOn": [],
        "tags": "[variables('tagsArray')]",
        "sku": {
            "name": "Basic",
            "tier": "Basic"
        },
        "properties": {
            "adminUserEnabled": true,
            "publicNetworkAccess": "Enabled",
            "zoneRedundancy": "Disabled"
        }
    }

The main change after creating the Container Registry using Default options is to enable Admin user which allows us to login used by docker.

Next important change we do on this resource is to register this resource in AAD by giving it a System assigned Identity using the portal.

Add Service connection

Next you need to add a service connection in your Azure Devops project using service principal authentication that to get access to Azure Container Registry. In the popup select Azure Container registery as Registry type, then select your azure container registry and give the service connection a name.

Buid and Deploy Docker project

Create a .net core application including a Dockerfile for windows. When you choose in Visual Studio it generates a Dockerfile which is not completely working. The following example is changed version of that file which works fine:

#See https://aka.ms/containerfastmode to understand how Visual Studio uses this Dockerfile to build your images for faster debugging.
#Depending on the operating system of the host machines(s) that will build or run the containers, the image specified in the FROM statement may need to be changed.
#For more information, please see https://aka.ms/containercompat


FROM mcr.microsoft.com/dotnet/aspnet:5.0 AS base
WORKDIR /app
EXPOSE 80
EXPOSE 443


FROM mcr.microsoft.com/dotnet/sdk:5.0 AS build
WORKDIR /src
COPY ["*.csproj", "SecuredWebApi/"]
RUN dotnet restore "SecuredWebApi/SecuredWebApi.csproj"
WORKDIR "/src/SecuredWebApi"
COPY . .
RUN dotnet build "SecuredWebApi.csproj" -c Release -o /app/build


FROM build AS publish
RUN dotnet publish "SecuredWebApi.csproj" -c Release -o /app/publish


FROM base AS final
WORKDIR /app
COPY --from=publish /app/publish .
ENTRYPOINT ["dotnet", "SecuredWebApi.dll"]

Create Container Instance

Next step is to create an Azure Container instance. In my example I gave it the name container-instance. During the creation you need to connect this to a container registry. You can choose Azure Container Registry created in the first step above. Once you have a successful build you will have an image available to associate it with it. Based on my sample project I named this instance secured-container-instance and Azure portal automatically recognizes the container registery when you select the Image Source from Azure Container Registry. For this project I exposed ports 80 and port 443
resources": [ { "location": "westeurope", "name": "secured-container-instance", "type": "Microsoft.ContainerInstance/containerGroups", "apiVersion": "2021-03-01", "properties": { "containers": [ { "name": "secured-container-instance", "properties": { "image": "securedcontainerregistry.azurecr.io/securedazurelib:latest", "resources": { "requests": { "cpu": "1", "memoryInGB": "1.5" } }, "ports": [ { "protocol": "TCP", "port": 80 }, { "protocol": "TCP", "port": 443 } ], } } ], "restartPolicy": "[parameters('restartPolicy')]", "osType": "Linux", "imageRegistryCredentials": [ { "server": "securedcontainerregistry.azurecr.io", "username": "[parameters('imageUsername')]", "password": "[parameters('imagePassword')]" } ], "ipAddress": { "type": "Public", "ports": "80 (TCP), 443 (TCP)" } }, "tags": {} }

Start the instance

By starting the instance on Container the image gets pulled and deployed in the container instance. On the Azure Portal you can look into the public ip adress and check the website is running and accessible.

A container instance can be started using docker command: docker run securedcontainerregistry.azurecr.io/securedazurelib:latest The following job tasks will start an instance in an Azure pipeline

jobs:
  - job: RunTest
    workspace:
      clean: all
    pool:
      vmImage: 'ubuntu-latest'
    steps:
    - task: Docker@2
      displayName: Login to ACR
      inputs:
        command: login
        containerRegistry: securedcontainerregistry
    - script: |
        docker run securedcontainerregistry.azurecr.io/somerepo/securedazurelib:latest

Security

You can register the container instance in AAD using Manage Identity and then assign a role in KeyVault for that identity to allow access to secrets.

Secrets in ARM templates

You may want to use a password in a template (let’s say user password of a VM or admin password of a SQL-server). Putting the password in your template, which is located in your source code repository, is not according to security guidelines.

One option to secure your strings would be to put them in KeyVault as a Secret and refer them from either paramters.json or in your main.json where it refer to a linked template.


First you need to set Azure Resource Manager for template deployment on checked within Access Policies of the keyvault where the template is refering to.

Deploying Templates

You could start a deployment right from the portal by adding a resource of type Template Deployment.

Another option would be using az CLI:

az deployment group create --resource-group newgrp1 --template-file main.json --parameters parameters.json

Or you could deploy it from your CD-pipeline locatedin Azure Devops.

Using Secured Secrets in Parameters.json

The following example refers to a secret called vmpassword within a keyvault called demovault10001 ie. located in newgrp1 resource group:

{
    "$schema": "https: //schema.management.azure.com/schemas/2019-04-01/deploymentParameters.json#",
    "contentVersion": "1.0.0.0",
    "parameters": {
        "adminUsername": {
            "value": "admin"
        },
        "adminPassword": {
            "reference": {
                "keyVault": {
                    "id": "/subscriptions/baaa99b3-1d19-4c5e-90e1-39d55de5fc6e/resourceGroups/newgrp1/providers/Microsoft.KeyVault/vaults/demovault10001"
                },
                "secretName": "vmpassword"
            }
        }
    }
}
}

Using Secured Secrets in main.json

Similar to above example we can refer to a secured password by setting the keyvault id and the secret name. In the following example we use this to pass the adminPassword as a parameter to nested template.

  {
    "$schema": "https://schema.management.azure.com/schemas/2019-04-01/deploymentTemplate.json#",
    "contentVersion": "1.0.0.0",
    "parameters": {
        "location": {
            "type": "string",
            "defaultValue": "[resourceGroup().location]",
            "metadata": {
                "description": "The location where the resources will be deployed."
            }
        },
        "vaultName": {
            "type": "string",
            "defaultValue": "appvault10001"
        },
        "secretName": {
            "type": "string",
            "defaultValue": "vmaccountpassword"
        },
        "vaultResourceGroupName": {
            "type": "string",
            "defaultValue": "newgrp1"
        },
        "vaultSubscription": {
            "type": "string",
            "defaultValue": "[subscription().subscriptionId]",
            "metadata": {
                "description": "The name of the subscription that contains the keyvault."
            }
        }
    },
    "resources": [{
            "type": "Microsoft.Resources/deployments",
            "apiVersion": "2018-05-01",
            "name": "dynamicSecret",
            "properties": {
                "mode": "Incremental",
                "expressionEvaluationOptions": {
                    "scope": "inner"
                },
                "template": {
                    "$schema": "https://schema.management.azure.com/schemas/2019-04-01/deploymentTemplate.json#",
                    "contentVersion": "1.0.0.0",
                    "parameters": {
                        "adminLogin": {
                            "type": "string"
                        },
                        "adminPassword": {
                            "type": "securestring"
                        },
                        "location": {
                            "type": "string"
                        }
                    },
                    "variables": {
                        "sqlServerName": "[concat('sql-', uniqueString(resourceGroup().id, 'sql'))]"
                    },
                    "resources": [{
                            "type": "Microsoft.Sql/servers",
                            "apiVersion": "2018-06-01-preview",
                            "name": "[variables('sqlServerName')]",
                            "location": "[parameters('location')]",
                            "properties": {
                                "administratorLogin": "[parameters('adminLogin')]",
                                "administratorLoginPassword": "[parameters('adminPassword')]"
                            }
                        }
                    ],
                    "outputs": {
                        "sqlFQDN": {
                            "type": "string",
                            "value": "[reference(variables('sqlServerName')).fullyQualifiedDomainName]"
                        }
                    }
                },
                "parameters": {
                    "location": {
                        "value": "[parameters('location')]"
                    },
                    "adminLogin": {
                        "value": "demousr"
                    },
                    "adminPassword": {
                        "reference": {
                            "keyVault": {
                                "id": "[resourceId(parameters('vaultSubscription'), parameters('vaultResourceGroupName'), 'Microsoft.KeyVault/vaults', parameters('vaultName'))]"
                            },
                            "secretName": "[parameters('secretName')]"
                        }
                    }
                }
            }
        }
    ],
    "outputs": {}
}

Apply SSL to your web service

You can chose to use a free managed certificate for your web app from Azure Portal:

  1. In Azure Portal go to TLS/SSL settings blade of your webapp.

  2. Choose Private Key Certificates on the top

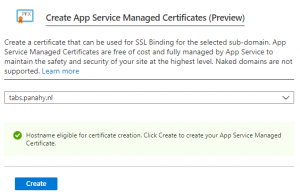
  3. Click on + Create App Service Managed Certificate

  4. In the popup select the sub-domain you want to choose

  5. Wait… and the sub-domain will be verified and will be get green:

  6. Hit on Create button and wait until it is finished.

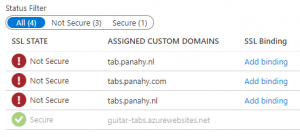
  7. Go to Custom domains blade in your App service.

  8. Notice that the newly created certificates are part of the custom domains.

     
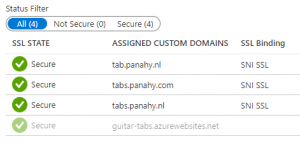
  9. Hit on Add binding on the sub-domain you want to associate.

  10. In the popup select the certificate and SSL Type. Then hit Add button.

Building Data Science Team

 From the book: http://www.datascienceassn.org/sites/default/files/Building Data Science Teams.pdf

A data-driven organization acquires, processes, and leverages data in a timely fashion to create efficiencies, iterate on and develop new products, and navigate the competitive landscape.

Author wrote also:

There are many ways to assess whether an organization is data driven. Some like to talk about how much data they generate. Others like to talk about the sophistication of data they use, or the process of internalizing data. I prefer to start by highlighting organizations that use data effectively.

See also: altexsoft.com blog post on datascience: how-to-structure-data-science-team-key-models-and-roles

What was my Wifi password?

If you have a Wifi connection on your Laptop and you need to know the password for it follow the next steps in a DOS command line:

netsh wlan show profile

This will show the known profiles. Copy the name of any profile you need to know its password.
Then call the next command to see the password in clear text:

netsh wlan show profile <name> key=clear

What is my IP-number in Azure

When you send a request to somewhere that uses your ip-number to whitelist, your ip number becomes important to know.
It is pretty simple when you do this on your laptop where you can open up a browser and find your outbound ip-number in Google. When you run your request within an Azure Web App which is running on an ASP, you might want to open up a console in Azure Portal and use the following PowerShell command:

(Get-AzWebApp -ResourceGroup <group_name> -name <app_name>).OutboundIpAddresses 

See also: find-outbound-ips

How to Ping in Azure Console

Source: https://docs.microsoft.com/en-us/azure/app-service/web-sites-integrate-with-vnet

Tools

The tools pingnslookup, and tracert won’t work through the console because of security constraints. To fill the void, two separate tools are added. To test DNS functionality, we added a tool named nameresolver.exe. The syntax is:
 
nameresolver.exe hostname [optional: DNS Server]

You can use nameresolver to check the hostnames that your app depends on. This way you can test if you have anything misconfigured with your DNS or perhaps don’t have access to your DNS server. You can see the DNS server that your app uses in the console by looking at the environmental variables WEBSITE_DNS_SERVER and WEBSITE_DNS_ALT_SERVER.

You can use the next tool to test for TCP connectivity to a host and port combination. This tool is called tcpping and the syntax is:

tcpping.exe hostname [optional: port]

The tcpping utility tells you if you can reach a specific host and port. It can show success only if there’s an application listening at the host and port combination, and there’s network access from your app to the specified host and port.

Additional debug steps include:

  • Connect to a VM in your virtual network and attempt to reach your resource host:port from there. To test for TCP access, use the PowerShell command test-netconnection. The syntax is:

    1 test-netconnection hostname [optional: -Port]

  • Bring up an application on a VM and test access to that host and port from the console from your app by using tcpping.

Think before going Microservices

The goal of microservices is to sufficiently decompose the application in order to facilitate agile application development and deployment.

The following is based on the book Microservices from Design to Deployment from NGINX. My goal is to know the difficaulties that this inevitable is bringing with in order to be prepared for.

The Drawbacks of Microservices

  1. One drawback is the name itself. The term microservice places excessive emphasis on service size. While small services are preferable, it’s important to remember that small services are a means to an end, and not the primary goal.
  2. Another major drawback of microservices is the complexity that arises from the fact that a microservices application is a distributed system. Developers need to choose and implement an inter-process communication mechanism based on either messaging or RPC. Moreover, they must also write code to handle partial failure, since the destination of a request might be slow or unavailable.

  3. Another challenge with microservices is the partitioned database architecture. Using distributed transactions is usually not an option, and not only because of the CAP theorem. They simply are not supported by many of today’s highly scalable NoSQL databases and messaging brokers. You end up having to use an eventual consistency-based approach, which is more challenging for developers.

  4. Testing a microservices application is also much more complex. A simple test class for a service
    would need to launch that service and any services that it depends upon, or at least configure stubs for those services.

  5. Another major challenge with the Microservices Architecture pattern is implementing
    changes that span multiple services. Fortunately, most changes typically impact only
    one service; multi-service changes that require coordination are relatively rare.

  6. Deploying a microservices-based application is also much more complex.

  7. Each service will have multiple runtime instances. That’s many more moving parts that
    need to be configured, deployed, scaled, and monitored. In addition, you will also need to
    implement a service discovery mechanism that enables a service to discover the locations
    (hosts and ports) of any other services it needs to communicate with.

Writing That Works

  • The foundations of effective business writing are simplicity and accuracy
  • emails: 
    • subjects are adequate
    • use positive tone
    • get to the point quickly and write only what’s relevant
    • etiquette is key
    • be explicit about your questions and requests
  • well-structured and focused presentations and speeches
    • engage your audience
    • finish with small memorable notes
    • use titles that builds anticipation
  • Drive people to action with clear plan and reports
    • purpose statement
    • facts
    • recommendations
    • purpose of the report should be clear and interesting
  • Speak to your reader’s desire and concerns
    • State what you want and offer your reasoning after the facts
    • demonstrate your competence with background information
    • grab reader’s attention 
  • Write a summary in bold
  • Edit and format your final product
    • cut out anything you think is not essential 
    • is the order correct
    • fact check
    • give yourself enough time between drafts, and have another person review 
    • format for smooth and appealing experience